

Detox : Gray box end-to-end test automation framework for react-native apps
This blog explains Detox Design, Working, Appium Comparison and Setting up detox framework in RN app (hands-on).


Table of contents
Pre Requisites
Node.js
https://nodejs.org/en/download/ or use Homebrew command
brew install node
(Note : Install Node.js v12.0 or above. Use nvm if you need to manage your node versions installed on a single machine)
Android Studio
Setting Up an Android Development & Testing Environment | Detox
Create and Launch Emulators using Terminal :
$ANDROID\_HOME/tools/bin/avdmanager create avd -n <emulatorname> -d pixel — package “system-images;android-30;google\_apis;x86”
$ANDROID\_HOME/emulator/emulator -verbose @<emulatorname>
Xcode
Setting Up an iOS Development & Testing Environment | Detox
Create and Launch Simulators using Terminal:
xcrun simctl list
open -a Simulator — args -CurrentDeviceUDID <UDID>
Detox Command Line Tools (detox-cli) [Optional]
detox-cli should be installed globally, enabling usage of the command line tools outside your npm scripts.
npm install -g detox-cli
Detox Design Principles
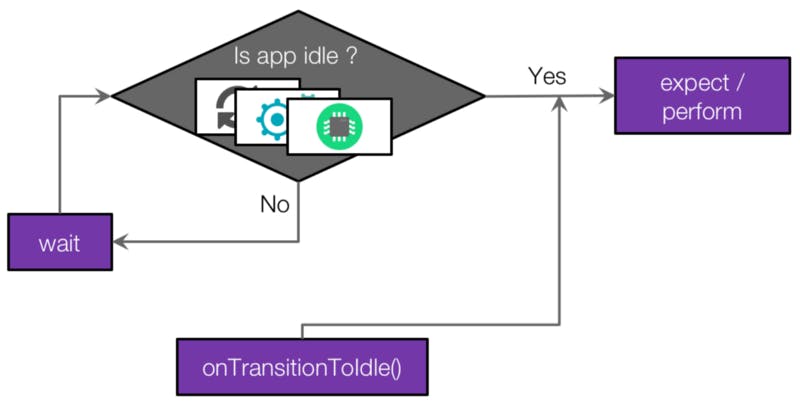
No need of Web driver - Detox uses EarlGrey and Espresso developed by Google that help us to write clear tests and give us the ability to synchronise with the app and interact with it when the app is idle.
Grey box - means that the tester has a partial understanding of the internal structure of the system under test.
Support for RN - React Native developers would love Detox as it is faster, debuggable and can be used with any test runner like Jest/Mocha. Detox can be integrated easily in any React Native app. The initial efforts to set up is much less than any other tools.
Expectations on app - Detox doesn’t depend on the test script running on Node.Js , it evaluates expectations directly in the tested app. Detox evaluates expectations natively directly in the tested app running on a simulator or device, instead of the test script running on node.Js.
Espresso and EarlGrey by Goggle

Espresso created by Google is a native framework for Android automated testing.
- Espresso’s automatic synchronisation of UI elements and test actions. Espresso has a simple and lightweight API.
- Espresso doesn’t require server communication, Espresso allows compiling automated Android UI tests into a separate APK i.e., the test suite will run next to the app on the device.
EarlGrey is a native iOS UI automation test framework created by Google.
- EarlGrey automatically synchronises with the UI, network requests, and various queues.
- EarlGrey is faster and effective in comparison to XCUITest.
Detox vs Appium
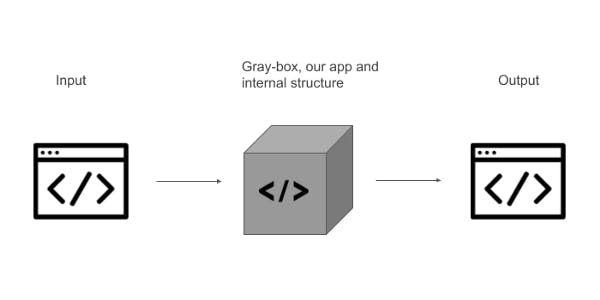
Gray-box-testing means that the tester has a partial understanding of the internal structure of the system under test. Monitoring the status of the app implies that Detox monitors the app in order to know when it’s idle. A test cannot continue to the next line if the app is busy.By monitoring the state of the app to tackle the problem of flaky tests.
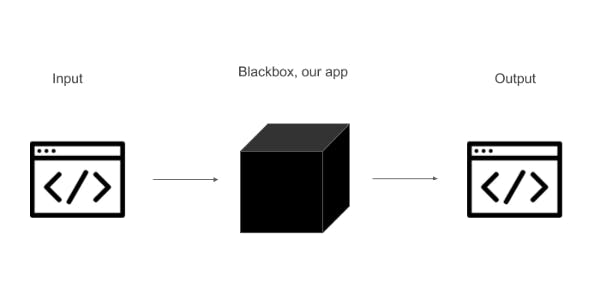
Black-box-testing is defined as a testing technique in which the functionality of the application is tested without looking at the internal code structure. The lack of monitoring of the state of the app might lead to flakiness.
Detox Architecture
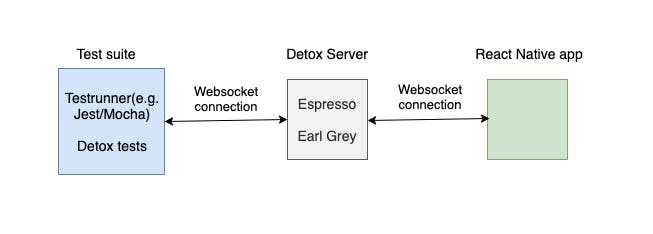
The test suite is being run outside of the app and communicates with the app via a network using a web socket, while the Detox server acts as a proxy, as shown in the figure above. After the invocation of a method by the test runner, the Detox server invokes the corresponding native testing method from the EarlGrey Testing framework of iOS or from the Espresso Testing framework of Android.
Appium Architecture
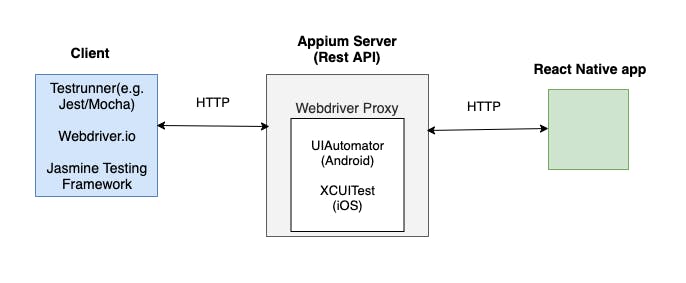
It uses a web server that exposes a REST API, as shown in the figure above. It receives connections from a client, listens for commands, executes those commands on a mobile device, and responds with an HTTP response representing the result of the command execution.
RN Application under Test
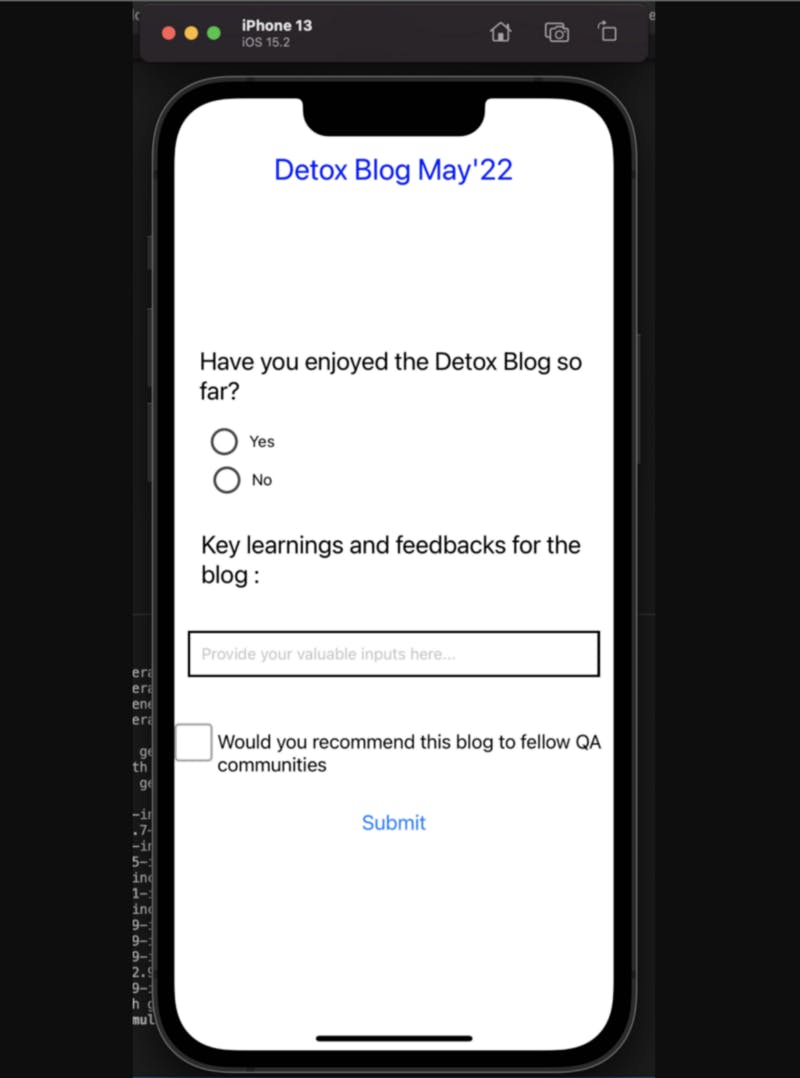
If you already have an application in which detox framework to be set up, Kindly ignore this section. For folks practising hands-on, Please feel free to use this sample react-native feedback app.
- Create a react-native project by running the following command:
npx react-native init <project_name>
- Install below packages as Dev dependencies :
npm install -D @react-native-community/checkbox
npm install -D react-native-radio-buttons-group
Add the below code in your App.js :
- Run your application in Simulator / Emulator :
npx react-native run-ios
npx react-native run-android
Setting up detox in react-native project
Install Detox node module as the first step:
npm install -D detox
Set up a Test Runner (use Jest / Mocha ) :
npm install -D jest
Set up Test-code Scaffolds :
npx detox init -r jest

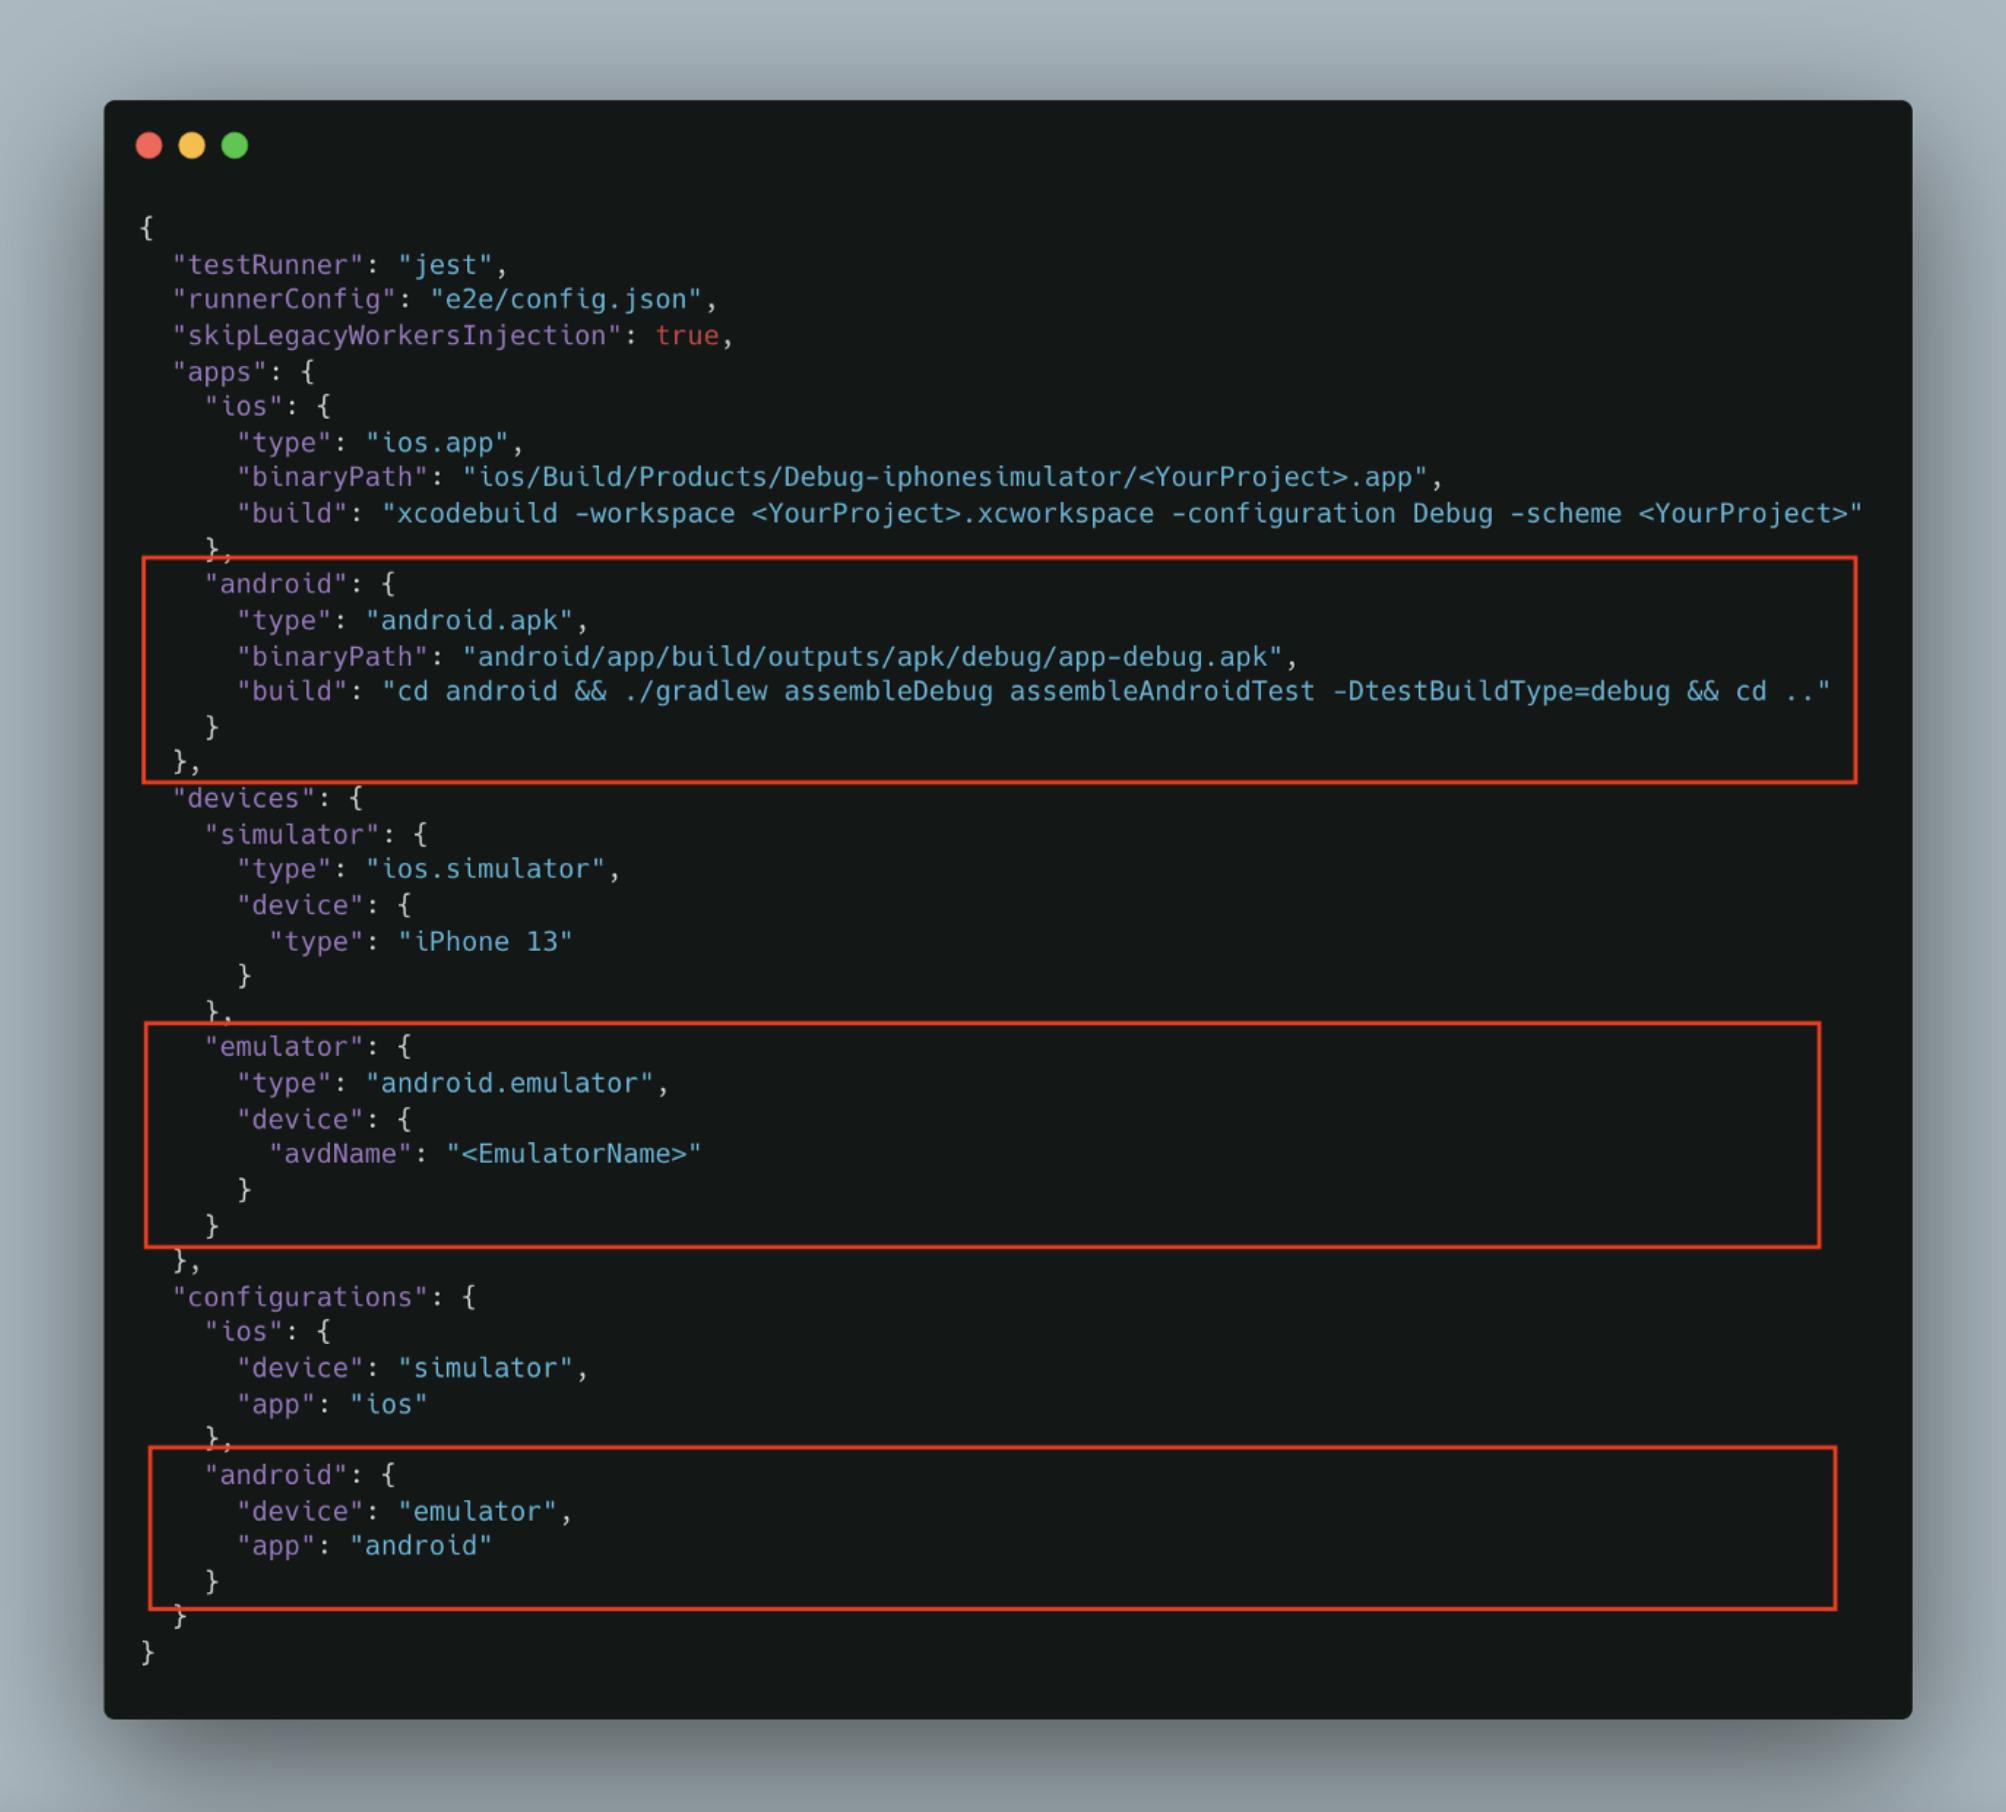
Detox iOS configuration (.detoxrc.json)
Configuring detox for iOS includes only updating the ”.detoxrc.json” file
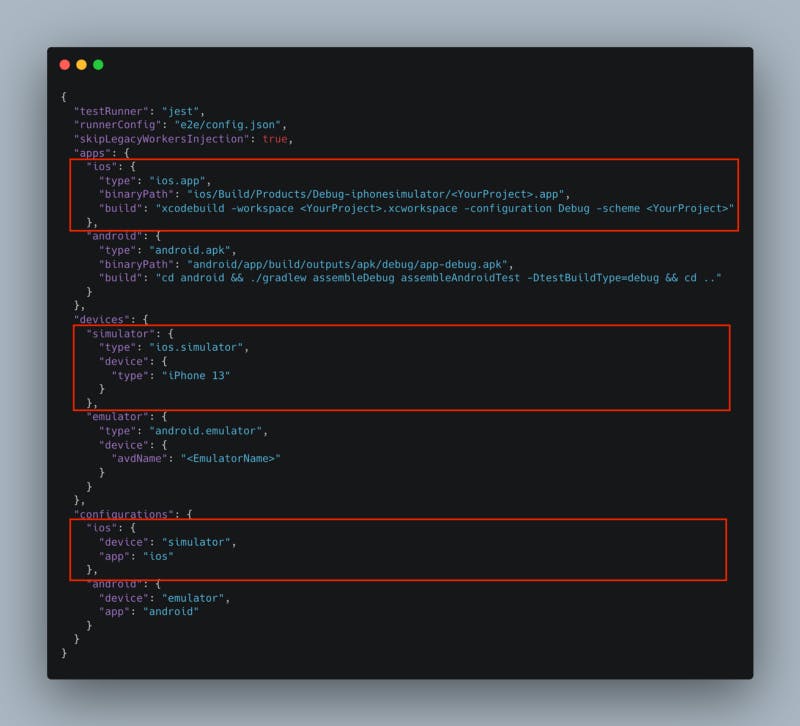
Under the key “binaryPath”, you should provide the path of the .app bundle to use. Under the key “build”, specify the xcodebuild command for your project. The ‘build’ command would output the app bundle in the path specified under ‘binaryPath’.
Detox Android configurations
- In “.detoxrc.json” file :
- Add below code in your root buildscript (i.e. android/build.gradle )
Note: add the 'allproject' section if it doesn’t exist
projects {
 repositories {
     // ...
     google()
     maven {
          // All of Detox' artifacts are provided via the npm module
          url "$rootDir/../node\_modules/detox/Detox-android"
      }
  }
- Add below code in your app’s buildscript (i.e. android/app/build.gradle)
dependencies {
    // ...
    androidTestImplementation('com.wix:detox:+')
}
and add this to the defaultConfig subsection
android {
  // ...

  defaultConfig {
      // ...
      testBuildType System.getProperty('testBuildType', 'debug')  // This will later be used to control the test apk build type
      testInstrumentationRunner 'androidx.test.runner.AndroidJUnitRunner'
  }
}
Create a Detox-Test Class : Detox requires a dummy implementation of a single Android-native test.
- Add a new file to your project, under this path and name => android/app/src/androidTest/java/com/[your.package]/DetoxTest.java. Double-check that the path is correct!
- Copy & paste the content of the equivalent file from the detox example app for RN, into it. Don’t forget to change the package name to your project’s package name!
Writing detox test scripts
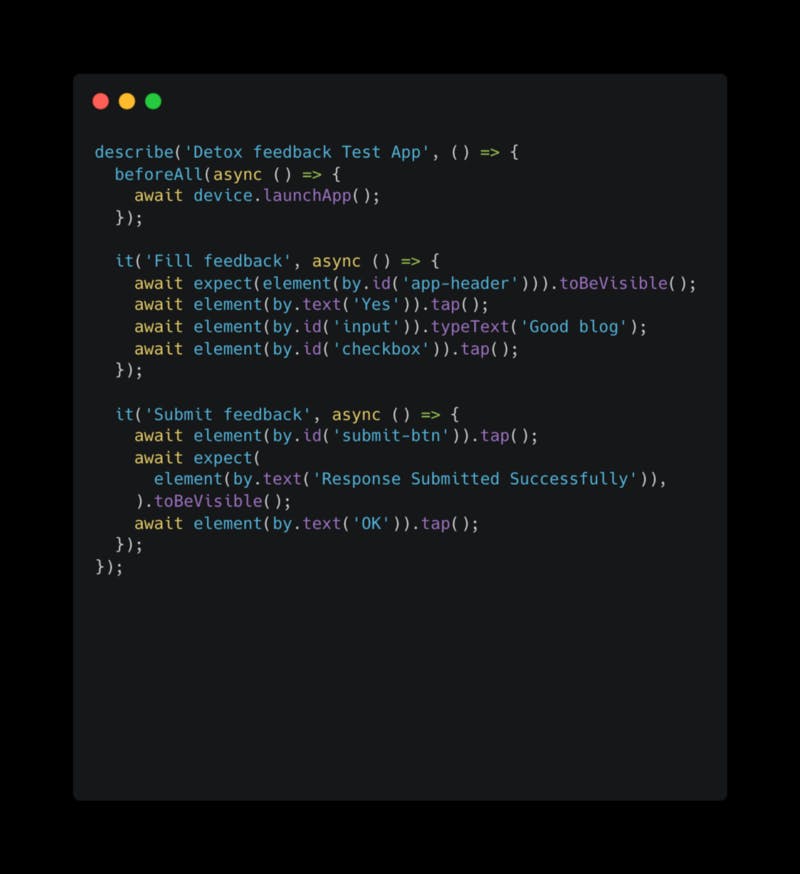
- Locator strategy :
To eliminate difficulties involved in locating elements in Android/iOS using various Inspectors, it is recommended to define and use testID (common for both Android/iOS). In the below video, we will define testID for the elements( app header , checkbox, submit button in sample feedback app) to be automated.
For detailed info on other detox locator strategies , check out this link.
- Adding test cases :
We will now automate steps to fill and submit feedback.
This test script will work smoothly for both android and iOS without any alterations specific to platform.
- Running tests in Emulator/Simulator :
In the below video, I have explained the configurations in .detoxrc.json file once again. Used the following commands to build app bundle and run test scripts in Android and iOS.
detox build -c androiddetox test -c android
For generating test artifacts, run following command.
detox test --record-videos all --take-screenshots all -c ios
- Exploring API’s provided by Detox, Pros and issues:
This is an optional section explaining additional information on writing effective test scripts using various API’s and docs provided by detox.
Authors & References

Do ❤️ the post if you found it useful. Follow for more updates. ✌🏼